On my Prusa Mendel RepRap I have Wantai stepper motors. I get them off Ebay, straight from the factory. Like something out of Home Improvement, I went a little over the top and got steppers that are a tad overpowered for 3D printing. But, I love them, they barely break a sweat or heat up even after hours of printing.
Stepper motors are a little different from most electric motors. Rather than just spin, they have the ability to ‘step’ and perform fairly accurate partial rotations. These steps make it very easy to tell your stepper motor to rotate say only 7.2°. This is really important for 3D printing, as a big element of 3D printing is just about making lots of these small, precise movements.
The super power 1.8 degree stepper motors that I run on my RepRap can make 200 steps in a single rotation, this means the smallest rotation they can possible do is 1.8°. I found some other stepper motors that can do a massive 400 steps a rotation, and got me wondering. If I upgraded my stepper motors, will I notice much of an improvement in print accuracy and quality? So I fired off a question to the now defunct Makers Stackexchange. Soon after, the awesome Adam Davis replied with the following answer.
The Answer:
The tradeoff, mechanically, between the two resolutions is typically a small decrease in torque due to the way stepper motors are designed. You can compensate with higher currents or larger motors if needed. You also need to double the speed of your driver to maintain the same machine speed if you go with a finer resolution stepper. Check out and compare the motor specifications to see this effect as you move from one resolution to another in the same size motor package.
Further, current electronics packages and firmware tend to be designed for lower resolution, faster machines. As such there are reports that you can only go up to 1/8 microstepping on the higher resolution steppers. If you have 1/8 on the high resolution stepper, and 1/16 on the low resolution stepper, you end up with nearly the same effective resolution.
At this point in time the practical answer to the “will I get better/faster prints from a 0.9 degree stepper motor” is no. If one costs less than the other, you might choose based on price. If you are experimenting with high resolution, slow printing and you are writing your own controller firmware, then you might gain some benefit from the 0.9 degree steppers.
http://www.dreevoo.com/forum_post.php?idt=12483
Showing posts with label Stepper Motor. Show all posts
Showing posts with label Stepper Motor. Show all posts
Friday, December 13, 2019
SELECTING THE RIGHT LINEAR ACTUATOR BUILT-IN TECHNOLOGY
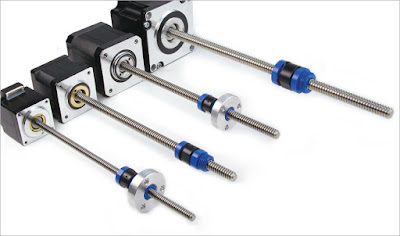
Generally, stepper motor linear actuators are available for standard stepper motor sizes (NEMA 8, NEMA 11, 14, 17, and 23 motor frame sizes), single or double stacked, with a variety of motor winding options and linear resolution options ranging from 0.063 to 7.5 μin of linear travel per step. Available offerings may differ in their ability to handle radial and moment loads, capability to integrate other devices, visibility of rotating parts, mounting options, and customization capability, so it is wise to consider your needs in these areas before purchasing one.
Radial and moment load handling. Although most related applications involve axial loads, a properly fitted system should be able to achieve radial or moment loads of five to ten percent of the axial load. If your application requires radial and moment load handling, look for actuators with integrated bushings or other features that provide this ability for “side load.”
Integrating external devices. There is certainly a trend toward integrating multiple devices to improve control and reduce maintenance costs. It may, for example, be desirable to attach linear encoders to the back of the stepper motor. To keep this option open, avoid assemblies in which the screw extends out the back of the motor.
Mounting. If you are replacing existing motors, you can save yourself some trouble by purchasing a motor with NEMA-standard bolt-hole patterns. Hole positions can always be customized but starting with the NEMA standard will save you trouble on initial purchase and into the future.
Customization. In addition to bolt-hole pattern customization, customization options include end machining, wiring, cabling, and connectors.
If you have skilled resources in-house, building your own anti-rotational guidance for your integrated motorized lead screw actuator might have some short-term cost advantages; however, purchasing an integrated stepper motor linear actuator will get you into production faster and provide more accurate and reliable motion, while reducing longer-term maintenance and total cost of ownership.
Friday, November 1, 2019
Safe Installation of Stepper Motor for 3D Printer
Installing steppers is a fairly straightforward process thanks to the standardized connectors used by most manufacturers. Simply plug the motor into the correct slot of the control board, and you should be good to go. However, there are still a few things to watch out for:
First, never install a motor (or anything, for that matter) on a printer while it is on and plugged in. This is hazardous because if done incorrectly, you risk shocking yourself, frying delicate components, and starting an electrical fire. So please, power off the printer and unplug it before commencing work.
Second, never unplug a step motor that is being powered. If you paid attention to the first step, this isn’t a problem, but if you didn’t, you’ll likely end up frying your stepper driver, and possibly your control board.
Third, ensure your digital stepper drivers are supplying the correct amount of current to the motors. This can be adjusted through the potentiometers on the driver board, or in some cases through the software of the printer. Too little current means the motor won’t have the proper torque, and too much can cause it to overheat.
Lastly, if you notice anything obviously wrong with the operation of the motor after installation, stop whatever you are doing and power down the printer. Carefully examine your wiring and driver circuit to ensure there are no mistakes before continuing to use the motor (if there aren’t any, make sure the motor, driver, and software are all compatible). This is a safe habit to assume while working with electronics to avoid fires and fried components.
Code Explanation to control Nema 17 with Arduino
Circuit diagram to control Nema17 stepper motor with Arduino
Wednesday, October 30, 2019
NEMA 34 Size Motor Applications and Dimensions
NEMA 34 is a high torque hybrid bipolar stepping motor
with a 3.4×3.4 inch faceplate. Hybrid stepper has the combination of
the features of the Variable Reluctance Stepper Motor and Permanent
Magnet Stepper Motor. This motor has a step angle of 1.8 deg., this
means that it has 200 steps per revolution and for every step it will
cover 1.8°. This NEMA 34 is a 2-Phase motor with 4 wires. Compatible
controllers for this motor are CW230, CW250 and CW860.
How to use NEMA 34 Stepper Motor
As mentioned above this stepper motor draws high current so instead of controlling it directly, use an appropriately powerful stepper motor drivers like cw230. Wiring diagram for NEMA 34 Stepper motor is given below:

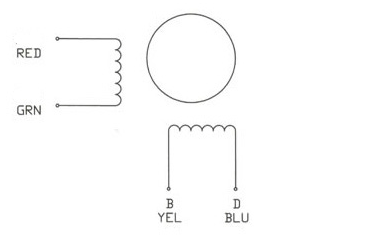
As shown in wiring diagram there are four wires of different colours i.e. Red, Green, Yellow and Blue. These wires are connected to two different coils. Red and Green connected to one coil while Yellow and Blue are connected to other.
To rotate the motor coils are energized in a logical sequence. To rotate the motor in anticlockwise motion of the rotor the phases are energized in the following sequence +A, +B, -A, -B, +B, +A and for the clockwise rotation, the sequence is +A, -B, +B, +A……..
Stepper Motor Applications
CNC machines
Precise control machines
3D printer/prototyping machines (e.g. RepRap)
Laser cutters
Pick and place machines
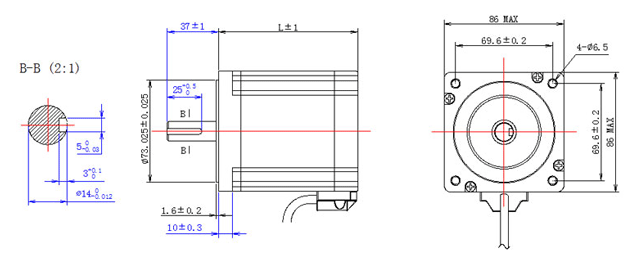
NEMA 34 Stepper Motor Dimensions

See more:
https://www.oyostepper.com/article-1091--NEMA-34-Stepper-Motor-Applications-and-Dimensions.html
How to use NEMA 34 Stepper Motor
As mentioned above this stepper motor draws high current so instead of controlling it directly, use an appropriately powerful stepper motor drivers like cw230. Wiring diagram for NEMA 34 Stepper motor is given below:

As shown in wiring diagram there are four wires of different colours i.e. Red, Green, Yellow and Blue. These wires are connected to two different coils. Red and Green connected to one coil while Yellow and Blue are connected to other.
To rotate the motor coils are energized in a logical sequence. To rotate the motor in anticlockwise motion of the rotor the phases are energized in the following sequence +A, +B, -A, -B, +B, +A and for the clockwise rotation, the sequence is +A, -B, +B, +A……..
Stepper Motor Applications
CNC machines
Precise control machines
3D printer/prototyping machines (e.g. RepRap)
Laser cutters
Pick and place machines
NEMA 34 Stepper Motor Dimensions

See more:
https://www.oyostepper.com/article-1091--NEMA-34-Stepper-Motor-Applications-and-Dimensions.html
Subscribe to:
Posts (Atom)
Core technology and structure adcantages of worm reduction gearbox
1.What is a worm gear reducer gearbox? A worm gear reducer gearbox is a compact mechanical device that transmits rotational motion between ...

-
If your stepper motor has 4 wires, it is a bipolar stepper motor. Bipolar stepper motors have two windings, which are not connected to ea...
-
You’ve got your stepper motor from Ebay, the manual is in Chinese and you don’t have a clue if the motor is unipolar or bipolar. Summarizi...
-
My wife and I have started designing a CNC/3D printer hybrid. I over engineered some structural designs so now my YZ assembly is a bit weig...


